This article explains how to use PostgreSQL in an ASP.NET Core application.
We will discuss the steps of creating a PostgreSQL database in Azure and then access the database in pgAdmin4, a popular and rich Open Source admin and development platform for PostgreSQL. The article then discusses the mechanism of accessing the database for performing CRUD operations using Entity Framework (EF) Core.
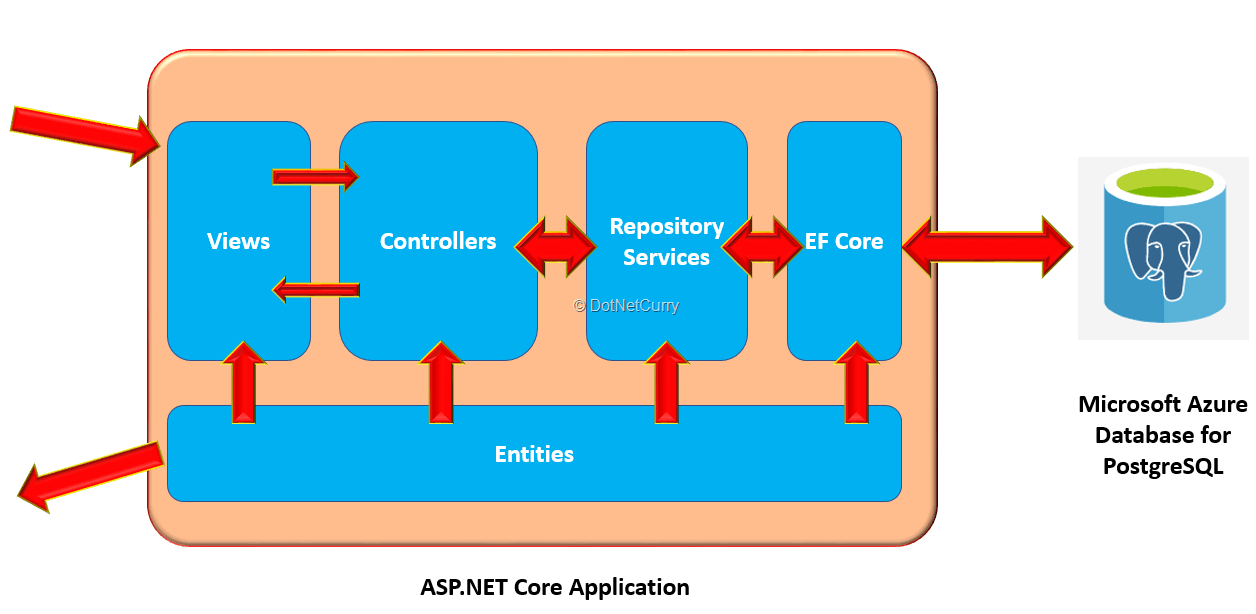
The following image explains the implementation:
PostgreSQL, some basics
PostgreSQL, is an open source object-relational database management system. Its primary function like any other ORDBMS is to store data securely and return that data efficiently in response to requests made by an application/software. It directly supports objects, classes and inheritance in database schemas.
PostgreSQL can be installed on Windows OS, MAC and Linux.
The default database of PostgreSQL is postgres. PostgreSQL allows to create a database with Table Schema, functions, triggers, views, etc. More information about PostgreSQL can be read from this link. PostgreSQL can be downloaded from this link.
Note: If you are familiar with SQL Server, then to create and manage a Database, SQL Server provides SQL Server Management Studio (SSMS). Likewise, to create and manage PostgreSQL database, the pgAdmin4 tool can be used. This is an Open Source tool that allows you to create and manage database and tables.
Why PostgreSQL?
In addition to the advantages listed at https://www.postgresql.org/about/advantages/, PostgreSQL when compared to other Open source RDBMS like MariaDB, MySQL etc. can support complex structures, as well as numerous data types. It is quite robust too.
Create PostgreSQL database using Azure Database for PostgreSQL
Azure Database for PostgreSQL is a PostgreSQL database service that is built on Microsoft's scalable cloud infrastructure for application developers. This provides features like performance, availability and security.
This section demonstrates steps for creating PostgreSQL database in Azure. To complete all steps in this section, an Azure subscription is required.
Note: PostgreSQL in Azure is currently shown as “In Preview” service. There may be some changes in features which are explained in the following steps. https://azur.e.microsoft.com/en-in/services/preview/
Step 1: Login using Live ID on Azure portal using https://portal.azure.com.
Step 2: The portal will shows various options in the menu. Click on New link on the menu, a New blade will be displayed. In the search box enter Azure Database for PostgreSQL. The search result will show various options for PostgreSQL as shown in the following image:
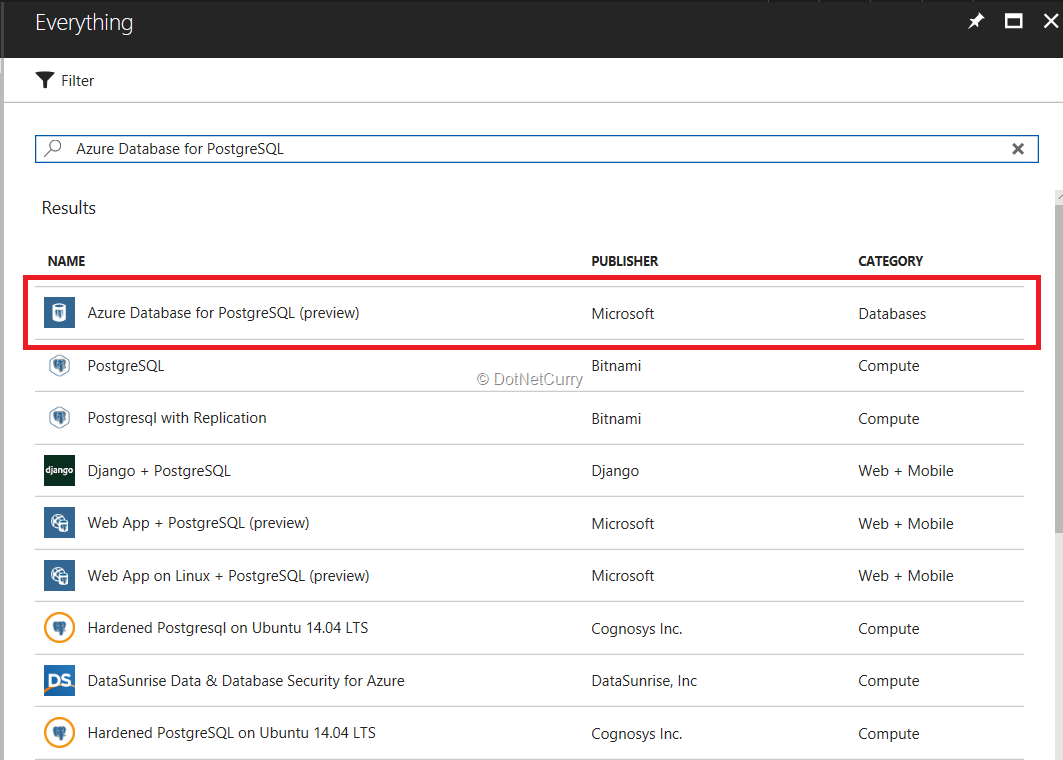
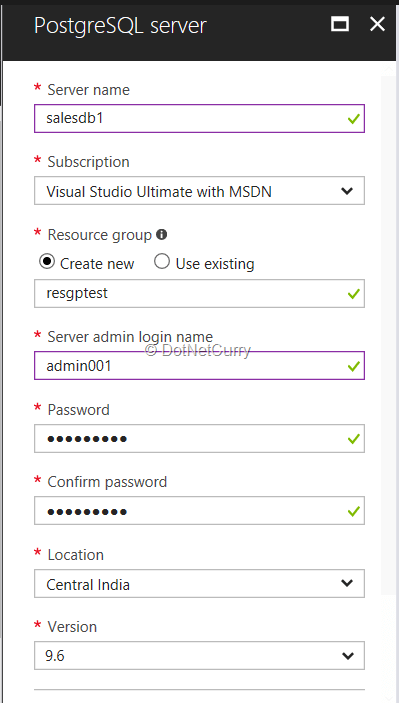
Select the Azure Database for PostgreSQL (preview) as marked in the above image. This will show a blade with Create button. Click on the Create button, to bring up a new blade where database information like, Server name, Subscription, Resource Group, Server admin login name, Password, Confirm Password, Location, Version, Pricing tier etc. needs to be entered as shown in the following image
The PostgreSQL service provides Basic, Standard and Premium (coming soon) pricing tiers. Select the pricing tier as per the need. The following image shows the pricing tier selection.
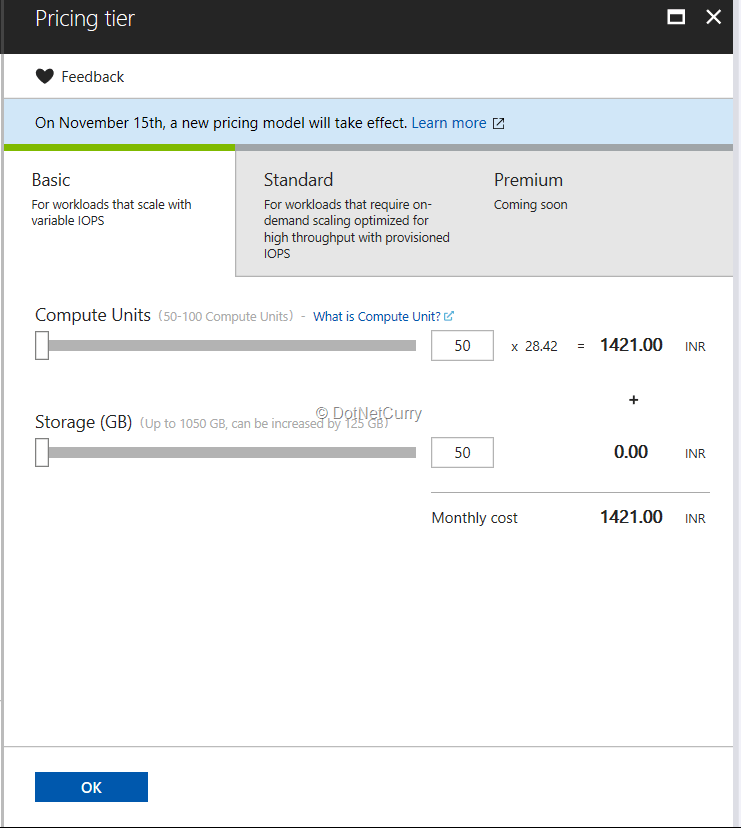
Click on OK and then click on Create button to create database. It will take some time to create database.
Step 3: Once the database is created, its details will be displayed as shown in the following image:
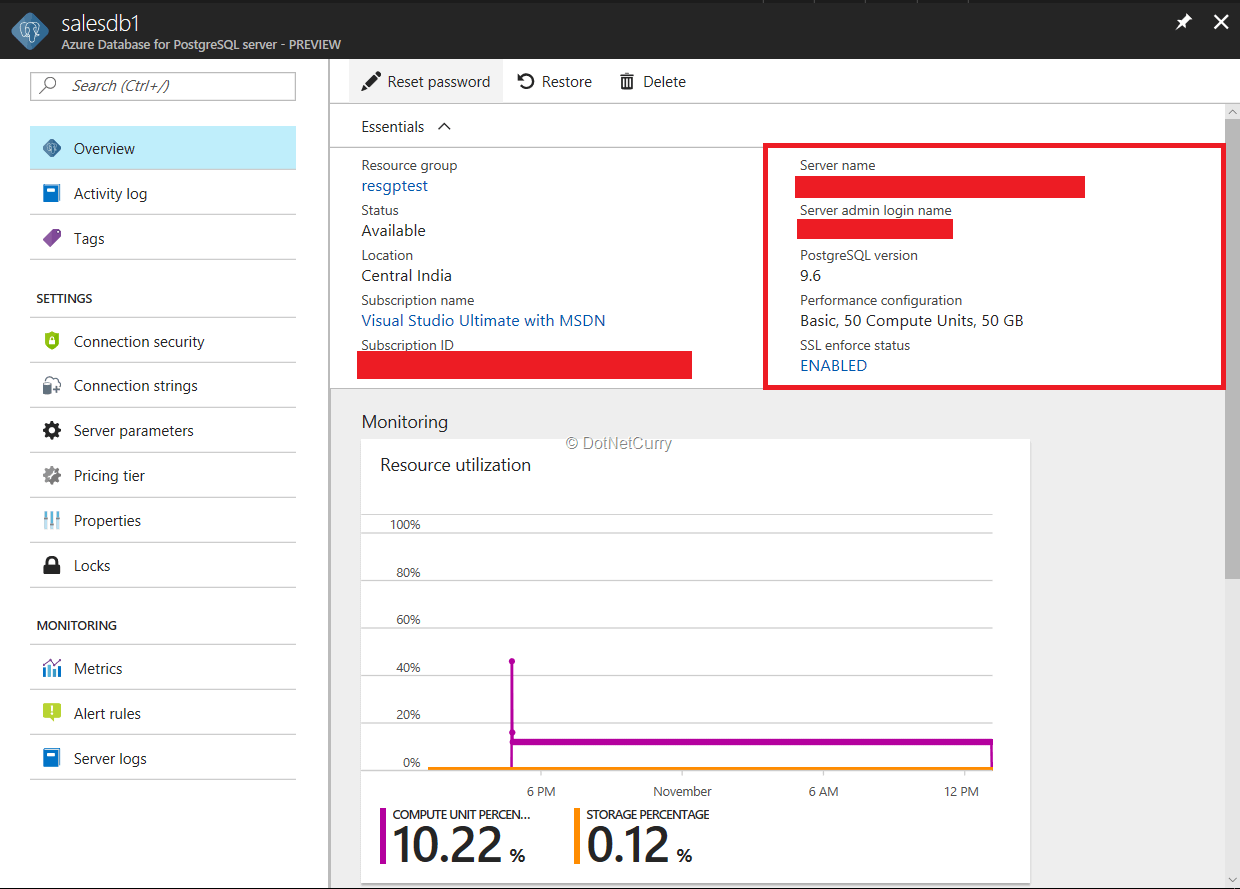
While using the database in the application, the following properties of the database is required
1. Server name
2. Server admin login name
3. SSL enforce status
This information is required while defining connection string to the database. PostgreSQL provides a default database of name postgres as shown in the following image

Step 4: To connect with the Azure Database for PostgreSQL, some firewall rules must be applied. This is similar to SQL PaaS. These rules can be applied using Connection security option as shown in the following image:
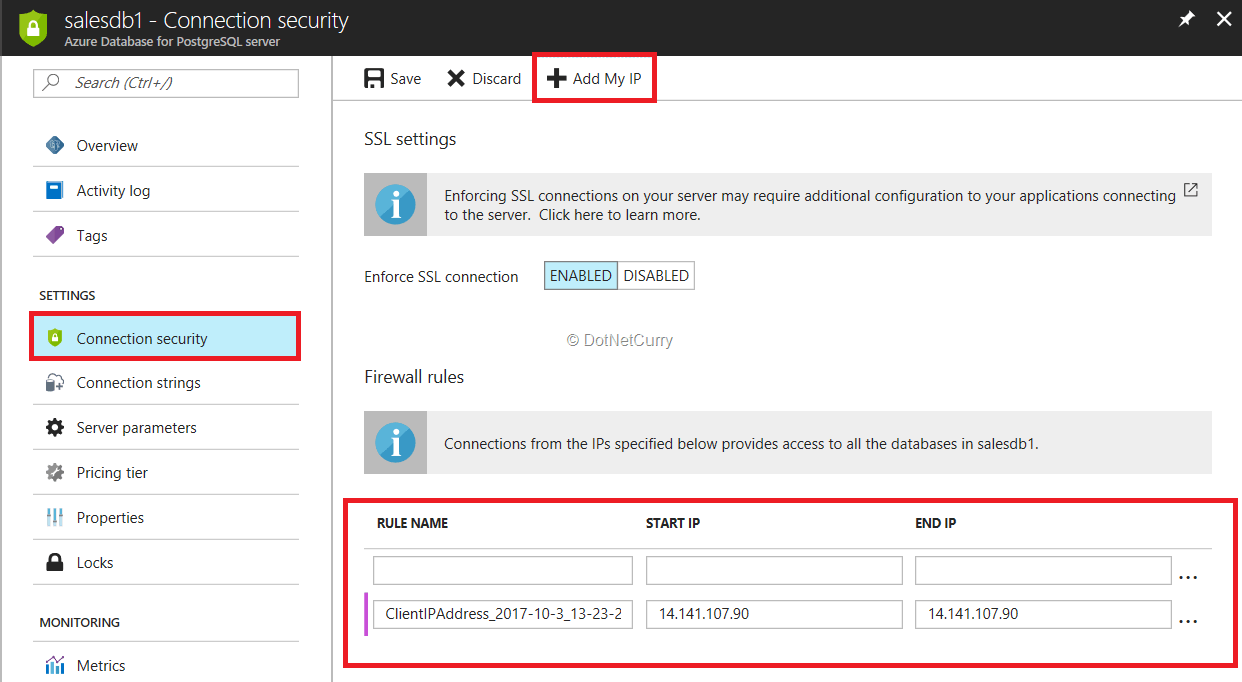
Note that for the current application, the Enforce SSL Connection is set to DISABLED. This feature is provided for secure access to the database.
Click on Connection strings option to view all the connection string as shown in the following image:
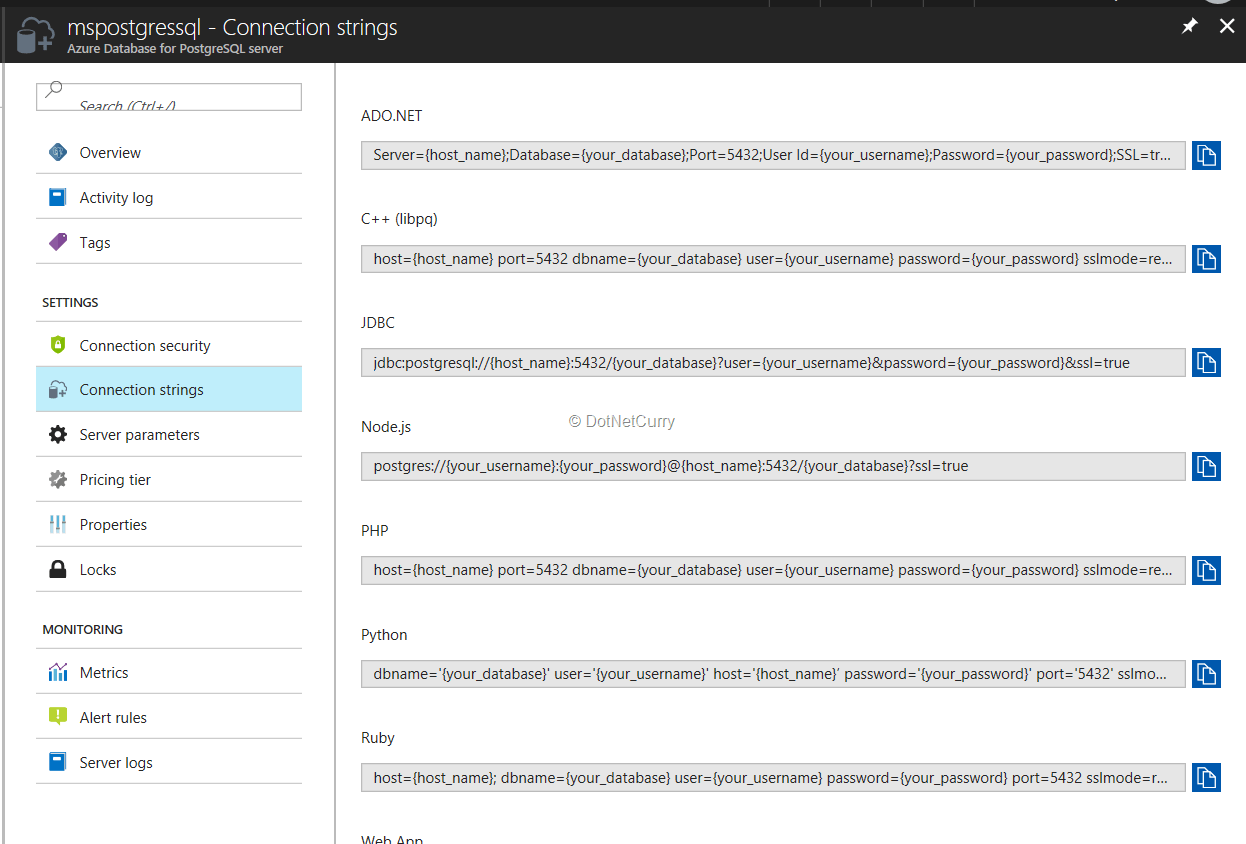
Copy the ADO.NET Connection string and paste it in notepad. This will be required in the later steps.
Connecting to the Azure database for PostgreSQL using pgAdmin4
Since the database is now ready, it’s time to create tables in it. To create tables, we will use the pgAdmin4 tool, as discussed in the following steps.
Step 1: Open the pgAdmin4 tool and login with the credentials which were set during an installation of pgAdmin4. pgAdmin4 will show the default connectivity with the local PostgreSQL database as shown in the following image:

Step 2: To connect to the Azure Database for PostgreSQL, right-click on the servers option and select Create > Server option as shown in the following image

This will bring up the Create-server window. In this window, set the Name for the server as follows:
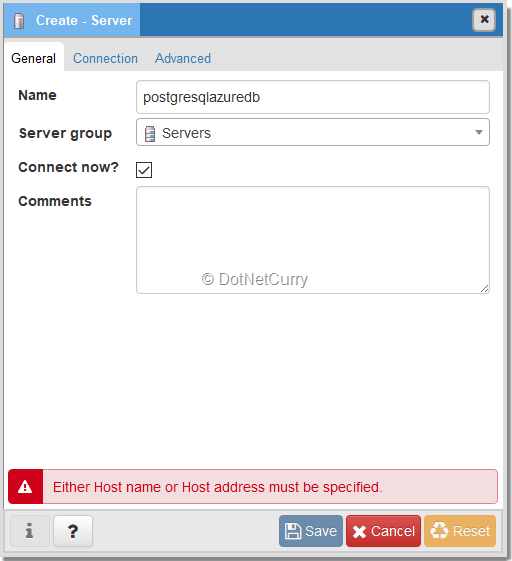
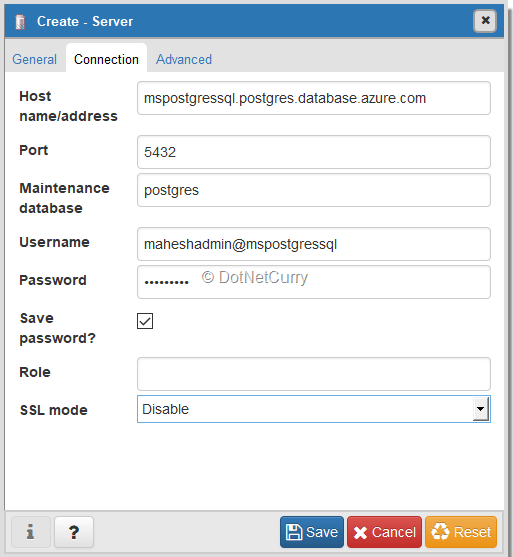
This shows an error message as Either Host name or Host address must be specified. To eliminate this error, select Connection tab and enter required details as
- Host name/address: server name provided by the Azure database for PostgreSQL.
- Port: Default set as 5432
- Maintenance dataset: Default set to postgres
- Username: default set to postgres. This must be changed based on the username set while creating database on Azure.
- Password: The Password
- Save password: Selecting this is up-to the developer.
- Role: The User role
- SSL Mode: The default value is Prefer. This needs to be changed based on the SSL mode set while creating database on Azure.
Note: While writing this article, a database of the name SalesDB was already created by me. I will be using the same SalesDB database for application development.
The following image shows the window after entering server details:
After clicking on the Save button, the pgAdmin4 tool will show the server and database information as shown in the following image:
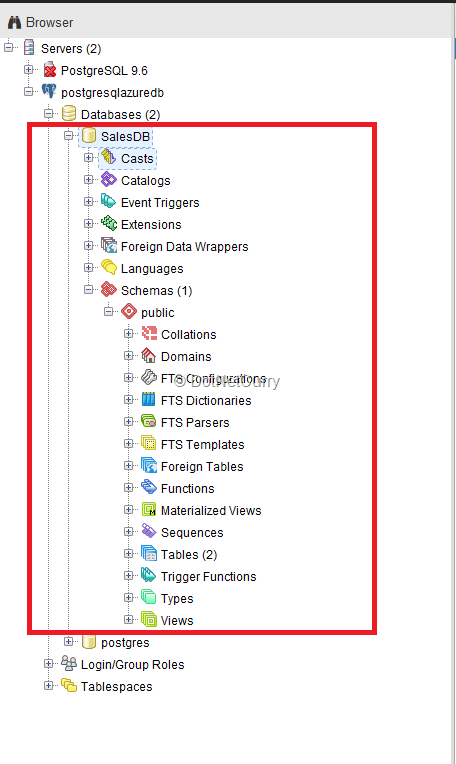
In the database, under Schemas node, a Tables node is provided to create table.
Step 3: To create tables, right-click on the Table select Create > Table option:

This will show the Create -Table window:

Set the name for the table as Categories. To add a column, add on Columns tab to add columns in the table:

The Categories table contains CategoryId (primary key) and CategoryName. Create a Products table with columns as ProductId (primary key), ProductName, Price, Manufacturer and CategoryId.
To define foreign key in the Products table, right-click on the Constraints node of the Products table as shown in the following image:
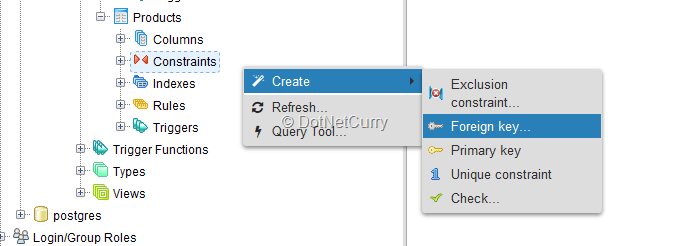
Select Foreign Key, this will display Create – Foreign key window as shown here:
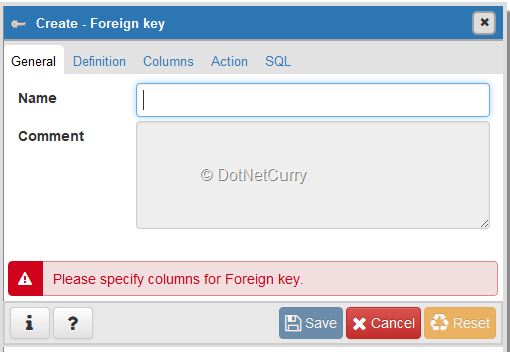
Set the name property as CategoryId and click on Columns tab. In the Columns tab, set values for Foreign Key as shown here: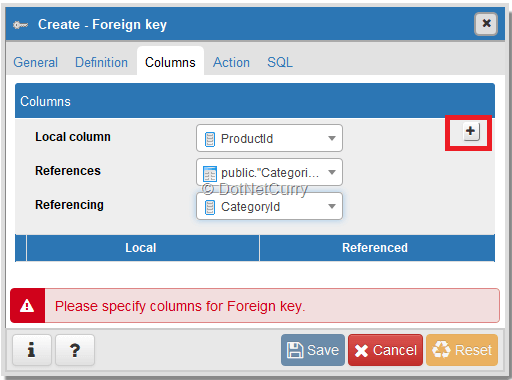
Click on the + button and then on the Save button, a foreign key will be added for the Products table.
To insert record in the table, right-click on the Table name and select Query Tool.. option:
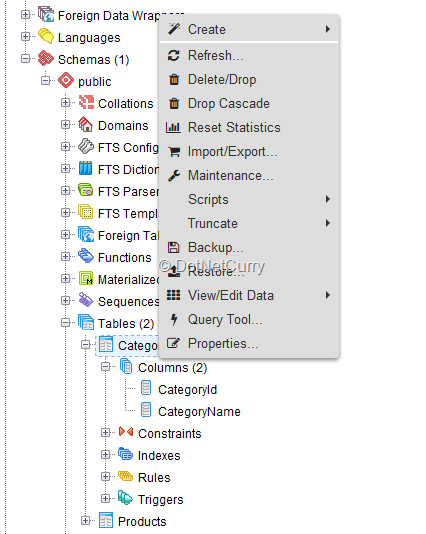
This will display the query blade where queries can be defined as seen here:
Execute these queries by clicking on the Execute button (marked in RED border) or press F5 button. This will insert records in the table.
To view records in the table, right-click on the table and select View/Edit Data > All Rows option.
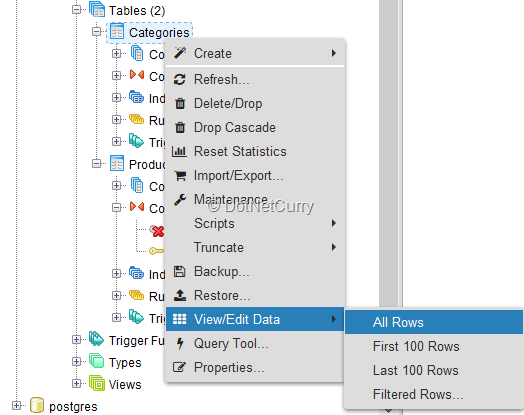
Doing so will show all records in the table.
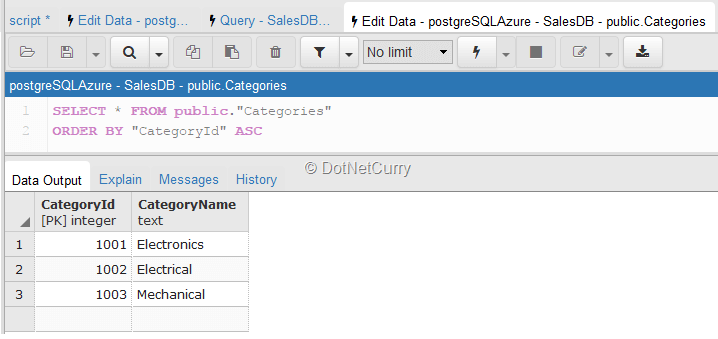
Repeat the same steps for Products table and add records in it.
Creating ASP.NET Core application With EF Core
This section will create an ASP.NET Core application with EFCore for creating CRUD operations with PostgreSQL database.
Step 1: Open Visual Studio 2017 and create a new ASP.NET Core Web Application. Name this application as aspnetcore_ef_postgre. Click on the Ok button of the New Project window and then select Web Application (Model-View-Controller) from New ASP.NET Core Web Application window.
In this project add the following NuGet Package

This package provides classes to interact with PostgreSQL for performing database operations.
Step 2: In the project, add a connection string copied from the notepad (see “Create PostgreSQL database using Azure Database for PostgreSQL” section) and paste it in the appsettings.json as shown in the following code
"ConnectionStrings": {
"SalesDBContext": "Server=mspostgressql.postgres.database.azure.com;Database=SalesDB;Port=5432;User Id=useradmin@mspostgressql;Password=Passw0rd_;"
}
|
Step 3: In the Models folder, add a new class file of name Category.cs. In this file, add the following code.
using System.ComponentModel.DataAnnotations;
using System.ComponentModel.DataAnnotations.Schema;
namespace aspnetcore_ef_postgre.Models
{
public class Category
{
[Required(ErrorMessage ="Category Id is Required")]
public int CategoryId { get; set; }
[Required(ErrorMessage ="Cateory Name is Required")]
public string CategoryName { get; set; }
}
}
|
This is the Category class. This contains the same properties as columns from the Categories table.
In the Models folder, add a new class file of name Product.cs. In this file, add the following code:
using System.ComponentModel.DataAnnotations;
using System.ComponentModel.DataAnnotations.Schema;
namespace aspnetcore_ef_postgre.Models
{
public class Product
{
[Required(ErrorMessage = "Product Id is Required")]
public int ProductId { get; set; }
[Required(ErrorMessage = "Product Name is Required")]
public string ProductName { get; set; }
[Required(ErrorMessage = "Product Manufacturer is Required")]
public string Manufacturer { get; set; }
[Required(ErrorMessage = "Product Price is Required")]
public int Price { get; set; }
public int CategoryId { get; set; }
public Category Cateogry { get; set; }
}
}
|
This is the Product class having same properties as columns in the Products table.
In the Models folder, add a new class file of the name SalesDBContext.cs. Add the following code in this file:
using Microsoft.EntityFrameworkCore;
namespace aspnetcore_ef_postgre.Models
{
public class SalesDBContext : DbContext
{
public DbSet Categories { get; set; }
public DbSet Products { get; set; }
public SalesDBContext(DbContextOptionsoptions) :base(options)
{
}
}
}
|
The above class is derived from DbContext class and contains DbSet properties to map with Categories and Products tables.
Step 4: In the project, add a new folder of the name Services. This folder will be used to contain Data Access services which will be registered as services in the IServiceCollection. In this folder, add a new interface of the name IRepository.cs. Add the following code in it
using System.Collections.Generic;
namespace aspnetcore_ef_postgre.Services
{
public interface IRepository where TEntity:class
{
void Create(TEntity entity);
void Delete(TPk id);
IEnumerable Get();
TEntity Get(TPk id);
void Update(TPk id, TEntity entity);
}
}
|
This is a generic interface containing code for CRUD operations for entities based on type set for TEntity.
In the Services folder, add a new class file of the name CategoryRepository.cs. Add the following code in this file
using aspnetcore_ef_postgre.Models;
using System;
using System.Collections.Generic;
using System.Linq;
namespace aspnetcore_ef_postgre.Services
{
public class CategoryRepository : IRepository
{
SalesDBContext context;
public CategoryRepository(SalesDBContext c)
{
context = c;
}
public void Create(Category entity)
{
context.Categories.Add(entity);
context.SaveChanges();
}
public void Delete(int id)
{
var cat = context.Categories.Find(id);
if (cat == null)
{
throw new Exception("Category Record Not found");
}
else
{
context.Categories.Remove(cat);
context.SaveChanges();
}
}
public IEnumerable Get()
{
return context.Categories.ToList();
}
public Category Get(int id)
{
var cat = context.Categories.Find(id);
if (cat == null)
{
throw new Exception("Category Record Not found");
}
else
{
return cat;
}
}
public void Update(int id, Category entity)
{
var cat = context.Categories.Find(id);
if (cat == null)
{
throw new Exception("Category Record Not found");
}
else
{
cat.CategoryName = entity.CategoryName;
context.SaveChanges();
}
}
}
}
|
The CategoryRepositoy class is injected with the SalesDBContext class. The CategoryRepositoy class implements IRepository interface with TEntity type as Category. This class contains code for performing CRUD operations
In the Services folder, add a new class file. Name this file as ProductRepository.cs. This file contains ProductRepository class implementing IRepository interface with type of TEntity as Product class. The ProductRepository constructor is injected with the SalesDbContext class. The ProductRepository class performs CRUD operations with the Products table. The following code shows an implementation of the ProductRepository class.
using aspnetcore_ef_postgre.Models;
using System;
using System.Collections.Generic;
using System.Linq;
namespace aspnetcore_ef_postgre.Services
{
public class ProductRepository : IRepository
{
SalesDBContext context;
public ProductRepository(SalesDBContext ctx)
{
context = ctx;
}
public void Create(Product entity)
{
context.Products.Add(entity);
context.SaveChanges();
}
public void Delete(int id)
{
var prd = context.Products.Find(id);
if (prd == null)
{
throw new Exception("Product record is not found");
}
else
{
context.Products.Remove(prd);
context.SaveChanges();
}
}
public IEnumerable Get()
{
return context.Products.ToList();
}
public Product Get(int id)
{
var prd = context.Products.Find(id);
if (prd == null)
{
throw new Exception("Product record is not found");
}
return prd;
}
public void Update(int id, Product entity)
{
var prd = context.Products.Find(id);
if (prd == null)
{
throw new Exception("Product record is not found");
}
else
{
prd.ProductName = entity.ProductName;
prd.Price = entity.Price;
prd.CategoryId = entity.CategoryId;
context.SaveChanges();
}
}
}
}
|
Step 5: To register the repository classes created in the previous step in ASP.NET Core dependency injection using IServiceCollection, modify the ConfigServices() method of the Startup class in Startup.cs as shown in the following code (highlighted):
public void ConfigureServices(IServiceCollection services)
{
services.AddMvc();
services.AddEntityFrameworkNpgsql().AddDbContext(opt => opt.UseNpgsql(Configuration.GetConnectionString("SalesDBContext")));
services.AddScoped<IRepository, CategoryRepository>();
services.AddScoped<IRepository, ProductRepository>();
}
|
An important part of the above code is the AddEntityFrameworkNpgsql() method.
This method is used to register EFCore for PostgreSQL by reading connection string from the appsettings.json file. This indicates that EFCore is mapped with PostgreSQL with entities and DbContext that is used to perform CRUD operations. The ConfigureServices() method is also used to register CategoryRepositoy and ProductRepository classes.
Step 6: In the Controllers folder, add a new MVC controller. Name this controller as CategoryController and add the following code in it
using aspnetcore_ef_postgre.Models;
using aspnetcore_ef_postgre.Services;
using Microsoft.AspNetCore.Mvc;
namespace aspnetcore_ef_postgre.Controllers
{
public class CategoryController : Controller
{
IRepository repository;
public CategoryController(IRepository r)
{
repository = r;
}
public IActionResult Index()
{
var categories = repository.Get();
return View(categories);
}
[HttpGet]
public IActionResult Create()
{
var category = new Category();
return View(category);
}
[HttpPost]
public IActionResult Create(Category c)
{
repository.Create(c);
return RedirectToAction("Index");
}
}
}
|
This controller is injected with IRepository interface with Category entity class. This controller contains Action method as Index() and Create() to list all Categories and Create a new Category.
In the Controllers folder, add a new MVC controller. Name this controller as ProductController and add the following code in it
using aspnetcore_ef_postgre.Models;
using aspnetcore_ef_postgre.Services;
using Microsoft.AspNetCore.Mvc;
namespace aspnetcore_ef_postgre.Controllers
{
public class ProductController : Controller
{
IRepository repoCat;
IRepository repository;
public ProductController(IRepository rc,IRepository r)
{
repoCat = rc;
repository = r;
}
public IActionResult Index()
{
var products = repository.Get();
return View(products);
}
public IActionResult Create()
{
ViewBag.CategoryNames = repoCat.Get();
return View(new Product());
}
[HttpPost]
public IActionResult Create(Product prd)
{
try
{
repository.Create(prd);
return RedirectToAction("Index");
}
catch
{
ViewBag.CategoryNames = repoCat.Get();
return View(prd);
}
}
public IActionResult Delete(int id)
{
repository.Delete(id);
return RedirectToAction("Index");
}
}
}
|
This controller is injected with IRepository interface with Product entity class. The above controller contains action method as Index(), Create() and Delete() to list, create and delete Products. To display Category list in the Create view of the Create action method of the ProductController, the code defines ViewBag object storing all Categories.
Step 7: Scaffold views from CategoryController and ProductController.
The CategoryController will have Index and Create Views and ProductController will have Index, Create Views. (Note: For the brevity I am skipping steps for scaffolding Views from MVC Controllers.)
The Create View of Product i.e. Create.cshtml in the Product subfolder of the Views folder needs to show HTML Select element. To do so, modify the Create.cshtml and replace element for the CategoryId with HTML Select element using the following code
This will show Category names in the select element. Modify Index.cshtml in the Product subfolder of the View folder to execute Delete action as shown in the following code:
@Html.ActionLink("Delete", "Delete", new { id=item.ProductId })
|
To display Category and Product in the navigation menu on the Home Page (Index.cshtml of the Home controller), modify the < ul > element in the _Layout.cshtml of the Shared subfolder of the Views folder as shown in the following code
<ul class="nav navbar-nav">
<li><a>Home</a>
<li><a>Category</a>
<li><a>Product</a>
</ul>
|
Run the application. The following page will be displayed.

Click on the Category link and the Categories list will be displayed as shown in the following image
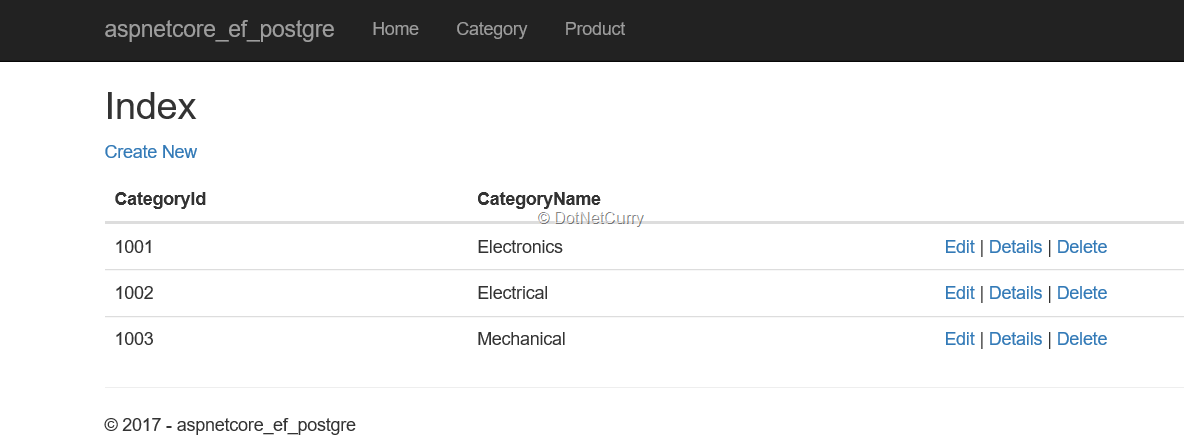
Click on the Create New link, the Create Category View will be displayed.
In this view enter Category data e.g. CategoryId and CategoryName and click on the Create button. A new category gets added. It can be viewed using pgAdmin4 tool as discussed earlier. Likewise test the Product actions also.
Conclusion:
ASP.NET Core with EF Core can be easily mapped with an open source database like PostgreSQL on Azure for application development.